
Setting up a WordPress staging site is an essential step in website development and maintenance. It allows you to test changes, experiment with new features, and fix issues without affecting your live site. In this comprehensive guide, we’ll cover everything you need to know about setting up a WordPress staging site. So, let’s dive in and learn how to create a safe testing environment for your WordPress website.
What is a WordPress Staging Site?
Before we dive into the process of setting up a WordPress staging site, let’s clarify what it actually is. A staging site is a clone or replica of your live WordPress website that allows you to test changes, plugins, themes, and updates in a safe environment before implementing them on your live site. It serves as a sandbox where you can experiment, make mistakes, and perfect your website without impacting the user experience on your main site.
Why Do You Need a Staging Site for Your WordPress Website?
Having a staging site offers numerous advantages for WordPress website owners. Here are a few key reasons why setting up a staging site is crucial:
- Prevent Potential Disruptions: By testing changes on a staging site first, you can identify and resolve any issues or bugs before they impact your live site. This helps prevent potential disruptions and ensures a seamless user experience.
- Experiment with New Features: A staging site allows you to try out new plugins, themes, or customizations without affecting the functionality of your live site. You can assess their impact and decide whether they are a good fit for your website.
- Test Updates and Upgrades: Before implementing major updates or upgrades, it’s essential to test them on a staging site. This way, you can ensure compatibility with your existing setup and avoid any compatibility issues or conflicts.
- Collaborate and Seek Feedback: If you work with a team or seek feedback from clients or stakeholders, a staging site provides a safe environment for collaboration and review. You can share the staging site URL and gather feedback without affecting the live site.
Preparing to Set Up a WordPress Staging Site
Before setting up a staging site, there are a few key steps you need to take to ensure a smooth process:
Backup Your Website: It’s crucial to create a backup of your live site before proceeding with setting up a staging site. This ensures that you have a restore point in case anything goes wrong during the setup or testing process.
Choose a Suitable Hosting Provider: Not all hosting providers offer built-in staging site functionality. Research and choose a hosting provider that supports staging sites or consider using a WordPress staging plugin.
Consider Your Website Size: Depending on the size and complexity of your website, the setup process may vary. Keep this in mind as you proceed with the staging site setup. Larger websites with extensive content and databases may require additional resources or specific configurations.
Gather Necessary Information: Make sure you have the login credentials for your WordPress admin dashboard and your hosting account. You’ll need these details during the staging site setup process.
Choose a Domain/Subdomain: Decide whether you want to set up your staging site as a subdomain (e.g., staging.yourwebsite.com) or a subdirectory (e.g., yourwebsite.com/staging). Consider your specific needs and preferences when making this decision.
Keep in mind that most WordPress software licenses are configured by domain name, meaning you may have to determine if a premium plugin developer has a solution for staging sites, many developers recognize staging* subdomains within their code.
Choosing the Right Staging Environment
When it comes to setting up a WordPress staging site, you have a few options for creating the staging environment. Here are the two primary methods:
Staging Site Provided by Hosting: Most hosting providers offer built-in staging site functionality as part of their hosting plans. Check if your hosting provider provides this feature and follow their instructions for creating a staging site.
WordPress Staging Plugins: If your hosting provider doesn’t offer a built-in staging site feature, you can use a WordPress staging plugin. These plugins allow you to create a staging site within your WordPress installation easily.
Using your web host’s built-in staging environment is recommended, we’ll cover using Kinsta’s staging environments below.
Now that you’ve gathered the necessary information and chosen your staging environment, let’s dive into the step-by-step guide on how to set up a WordPress staging site.
Step-by-Step Guide: How to Set Up a WordPress Staging with Kinsta
Step 1: Log in to your Kinsta Account:
Visit the my.kinsta.com website and log in to your account if you aren’t already.
Step 2: Select Your Website:
Once logged in, you’ll see a list of your websites hosted at Kinsta. Select the website for which you want to create a staging site.
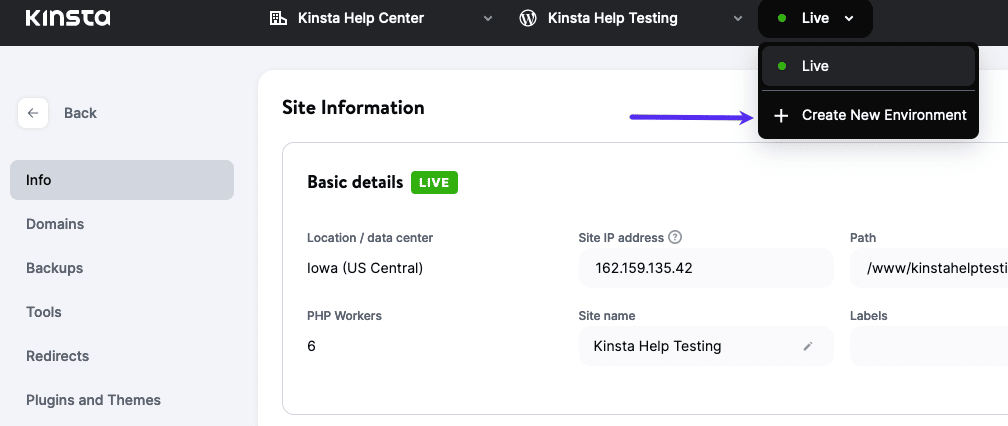
Step 3: Go to the Environment Selector at the top :
Click the dropdown which shows the current environment (Live) in our case, and select Create New Environment.
Step 5: Choose the Environment Type:
Kinsta offers two options for staging environment types: “Standard” and “Premium”.
The “Standard” option is included within your current plan, all sites on Kinsta get a free staging environment! Standard staging environments typically are allotted fewer resources compared to live/production sites.
The “Premium” option allows you to create a staging/development environment with the same resources as your live/production site. The feature is billed at $20 per month, per added environment, you can add multiples.
Step 6: Configure the Staging Environment:
In this step, you can choose how the environment is created. In most cases, we want a clone of the Live site, so we’ll choose “Clone existing environment“. You can also choose to create a fresh WordPress install or create an empty environment and build it out yourself.
You can give the environment the name you’d like which can be staging, stage, dev, or whatever.
Step 7: Click on “Create Staging Environment”:
Once you’ve configured the staging environment, click on the “Create Staging Environment” button to initiate the creation process.
Step 8: Wait for the Staging Environment to be Created:
Kinsta will now create the staging environment for your website. This process usually takes a few moments.
You can monitor the progress on the staging page. Once the staging environment is ready, you’ll receive a notification.
Step 9: Access and Manage Your Staging Site:
After the staging environment is created, you can access your staging site by using the top Environment Switcher and selecting “Staging” or whatever you named your environment.
The interface will look just like it does for your Live sites, minus the “CDN” and “Edge Caching” menu items.
From the Tools page, you can enable caching for the environment if needed, switch the PHP engine, perform a search and replace, enable password protection, and more.
You can also set up a custom staging site domain. By default, Kinsta assigns a subdomain to your staging site (e.g., staging-sitename.kinsta.cloud) though it may look something like (stg-sitename-environmentname.kinsta.cloud).
Find your staging URL as well as links to WP Dashboard on the Domains page.
Step 10: Test and Deploy Changes:
Use the staging site to make any changes, install plugins or themes, update content, or test new features.
Once you’re satisfied with the changes and everything works as expected, you can either push the changes to your live site (if you chose the “Push to Live” option) or manually implement the changes on your live site.
With Push to Live, you can choose to push only the site files, the site database, or both (the entire site).
Add devKinsta to Your Workflows for More Flexibility
Kinsta offers a free, local development tool called devKinsta which perfectly integrates with the host.
Things to Keep in Mind
- Pushing to live overwrites your live environment, meaning anything added or changed on the live site will be lost, including orders, new posts, etc
- Kinsta adds “noindex” tags to staging automatically, though you should enable “Discourage search engines from indexing this site” within WordPress as well
- Make sure protection is in place like Password Protection to prevent bots and unwanted traffic to the staging
- Be sure to keep staging updated with live in terms of plugins/themes/WordPress core
- It may be a good idea to Disable Emails while working on staging, this ensures that your users don’t receive emails in error
Step-by-Step Guide: How to Set Up a WordPress with WP Staging
The WP Staging plugin is a popular choice for creating a staging site directly within your WordPress installation. It allows you to easily clone your live site to a staging environment where you can make changes and test updates before deploying them.
The free version of the plugin will only allow you to test changes on a separate environment, Push to Live features are available in the Pro version.
Follow the steps below to set up the WP Staging plugin:
Step 1: Install and Activate the WP Staging Plugin:
Log in to your WordPress admin dashboard.
Navigate to “Plugins” > “Add New.”
Search for “WP Staging” in the plugin search bar.
Click “Install Now” next to the WP Staging plugin.
After installation, click “Activate” to activate the plugin.
Step 2: Access the WP Staging Settings:
Once the plugin is activated, a new menu item called “WP Staging” will appear in your WordPress admin sidebar.
Click on “WP Staging” to access the plugin’s settings and features.
Step 3: Configure Staging Site Options:
On the WP Staging settings page, click Create Staging.
Give the environment a name, this name will also be used as the URL of the staging site.
Select the database prefix for the staging site. It’s recommended to use a different prefix from your live site for better separation.
You can also exclude specific folders or database tables from being copied to the staging site if needed.
Step 4: Create a Staging Site:
After configuring the staging site options, click the “Create Staging Site” button to initiate the staging site creation process.
WP Staging will start copying your live site’s files and database to the staging environment.
Step 5: Wait for the Staging Site Creation:
The time it takes to create the staging site depends on the size of your website and server resources. Keep in mind that by default, all database tables and site files will be copied for use on the staging site.
During the process, WP Staging will display a progress bar indicating the status of the staging site creation.
Once the staging site is successfully created, you will receive a notification.
Step 6: Access and Manage Your Staging Site:
To access your staging site, go to the WP Staging settings page again and scroll down to the “Existing Staging Sites” section.
You will find the URL of your staging site along with options to manage it.
Click on the staging site URL to open it in a new tab and start working on your staging environment.
Step 7: Test and Deploy Changes:
With the staging site set up, you can now make changes, install plugins or themes, update content, or test any modifications without affecting your live site.
Use the staging site to thoroughly test the functionality, design, and performance of your website.
Once you’re satisfied with the changes and ready to deploy them, you can manually implement the modifications on your live site. You can purchase WP Staging Pro to push the changes directly.
Common Challenges and Troubleshooting
You may encounter some challenges or issues while setting up and using a WordPress staging site. Here are a few common problems and their possible solutions:
Staging Site Performance: If your staging site is slow or experiencing performance issues, check if your hosting provider offers dedicated staging resources or consider optimizing your staging environment for better performance.
Database Syncing Errors: Sometimes, during the process of syncing the staging site’s database with the live site, you may encounter errors. Ensure that your staging plugin or hosting provider supports smooth database syncing or consult their support for assistance.
Plugin or Theme Compatibility: In some cases, the plugins or themes installed on the staging site may not be compatible with your live site. Test them thoroughly on the staging site before pushing them to the live site to avoid any conflicts or compatibility issues.
File and Media Uploads: Pay attention to file and media uploads on the staging site. Ensure that they are not interfering with your live site’s media library or causing any duplication issues.
Tracking Code and Analytics: If you use tracking codes or analytics tools on your live site, make sure to update them on the staging site as well. This ensures accurate tracking and reporting during the testing phase.
SSL Certificates and HTTPS: If your live site has SSL certificates and HTTPS enabled, ensure that your staging site has the same configuration to avoid any mixed content issues or security warnings.
Remember, each staging site setup and troubleshooting process may vary depending on the staging plugin or hosting provider you choose. Consult the respective documentation or support resources for detailed instructions.
Best Practices for Using a WordPress Staging Site
To make the most out of your WordPress staging site, consider following these best practices:
Regularly Update the Staging Site: Keep your staging site up to date with the latest WordPress version, plugins, and themes. This ensures that the testing environment closely reflects your live site and helps identify any compatibility issues.
Secure Access to the Staging Site: Restrict access to the staging site using strong passwords, enabling two-factor authentication, or limiting access to specific IP addresses. This helps maintain the confidentiality and security of your staging environment.
Document Changes and Experiments: Maintain a log or documentation of the changes, experiments, and tests performed on the staging site. This makes it easier to track and revert changes if needed and provides a reference for future development. How to Track Changes in WordPress
Avoid Indexing the Staging Site: Prevent search engines from indexing your staging site by adding a “noindex” tag or using password protection. This ensures that the staging site doesn’t appear in search engine results and avoids duplicate content issues.
Also, make sure to enable the “Discourage search engines from indexing this site” setting in WordPress > Settings > Reading.

Backup Staging Site Regularly: Just like your live site, it’s important to regularly backup your staging site. This allows you to restore it if any issues occur or revert to a previous version if necessary.
Communicate with Your Team: If you’re working with a team or collaborating with others, communicate the purpose and guidelines of the staging site. Ensure everyone understands their role in the development process and follows the established procedures.
FAQs About Setting Up a WordPress Staging Site
Can I set up a staging site if my hosting provider doesn’t offer built-in staging functionality?
Yes, you can use WordPress staging plugins like WP Staging, Duplicator, or WP Stagecoach to create a staging site within your WordPress installation.
Staging or development environments are typically included, free of cost with managed WordPress hosting providers.
Is it necessary to have technical knowledge to set up a staging site?
Basic knowledge of WordPress and website management is helpful, but most staging plugins provide user-friendly interfaces that guide you through the setup process.
Can I make changes on the staging site without affecting my live site?
Yes, that’s the purpose of a staging site. You can experiment, make changes, install plugins or themes, and test updates without impacting your live site.
How often should I update the staging site?
It’s recommended to update the staging site whenever there are updates available for WordPress core, plugins, or themes used on your live site.
Can I use a staging site to test e-commerce functionalities?
Absolutely! A staging site is a perfect environment to test e-commerce functionalities, such as product additions, payment gateways, or order processing, without affecting real transactions.
Yes, you can share the staging site URL with clients, stakeholders, or team members to gather feedback or seek their input before implementing changes on the live site.
Conclusion
Setting up a WordPress staging site is a valuable step in the website development process. It allows you to test changes, experiment with new features, and fix issues without impacting your live site’s user experience. By following the steps outlined in this guide and adhering to best practices, you can confidently create a safe testing environment and perfect your WordPress site. Remember to back up regularly, communicate with your team, and document changes made on the staging site. Enjoy the flexibility and peace of mind that a staging site brings to your WordPress website development process.